<?xml version="1.0" encoding="utf-8"?><feed xmlns="http://www.w3.org/2005/Atom" ><generator uri="https://jekyllrb.com/" version="3.10.0">Jekyll</generator><link href="https://mrefaay89.github.io/feed.xml" rel="self" type="application/atom+xml" /><link href="https://mrefaay89.github.io/" rel="alternate" type="text/html" /><updated>2026-02-01T11:16:00+00:00</updated><id>https://mrefaay89.github.io/feed.xml</id><title type="html">Mohamed Refaay Blogs</title><subtitle>Hybrid Infrastructure &amp; Cloud Specialist.  Sharing insights on Virtualization, Data Protection, and Multi-Cloud solutions.</subtitle><entry><title type="html">Technical Guide: Deploying Nutanix on Cisco UCS in Standalone Mode (ISM)</title><link href="https://mrefaay89.github.io/hybrid-infrastructure/nutanix/cisco-ucs/2026/02/01/nutanix-cisco-ucs-standalone-deployment.html" rel="alternate" type="text/html" title="Technical Guide: Deploying Nutanix on Cisco UCS in Standalone Mode (ISM)" /><published>2026-02-01T00:00:00+00:00</published><updated>2026-02-01T00:00:00+00:00</updated><id>https://mrefaay89.github.io/hybrid-infrastructure/nutanix/cisco-ucs/2026/02/01/nutanix-cisco-ucs-standalone-deployment</id><content type="html" xml:base="https://mrefaay89.github.io/hybrid-infrastructure/nutanix/cisco-ucs/2026/02/01/nutanix-cisco-ucs-standalone-deployment.html"><![CDATA[<p><img src="/assets/images/nutanix_ism.png" alt="Nutanix on Cisco UCS ISM Header" /></p>

<p>
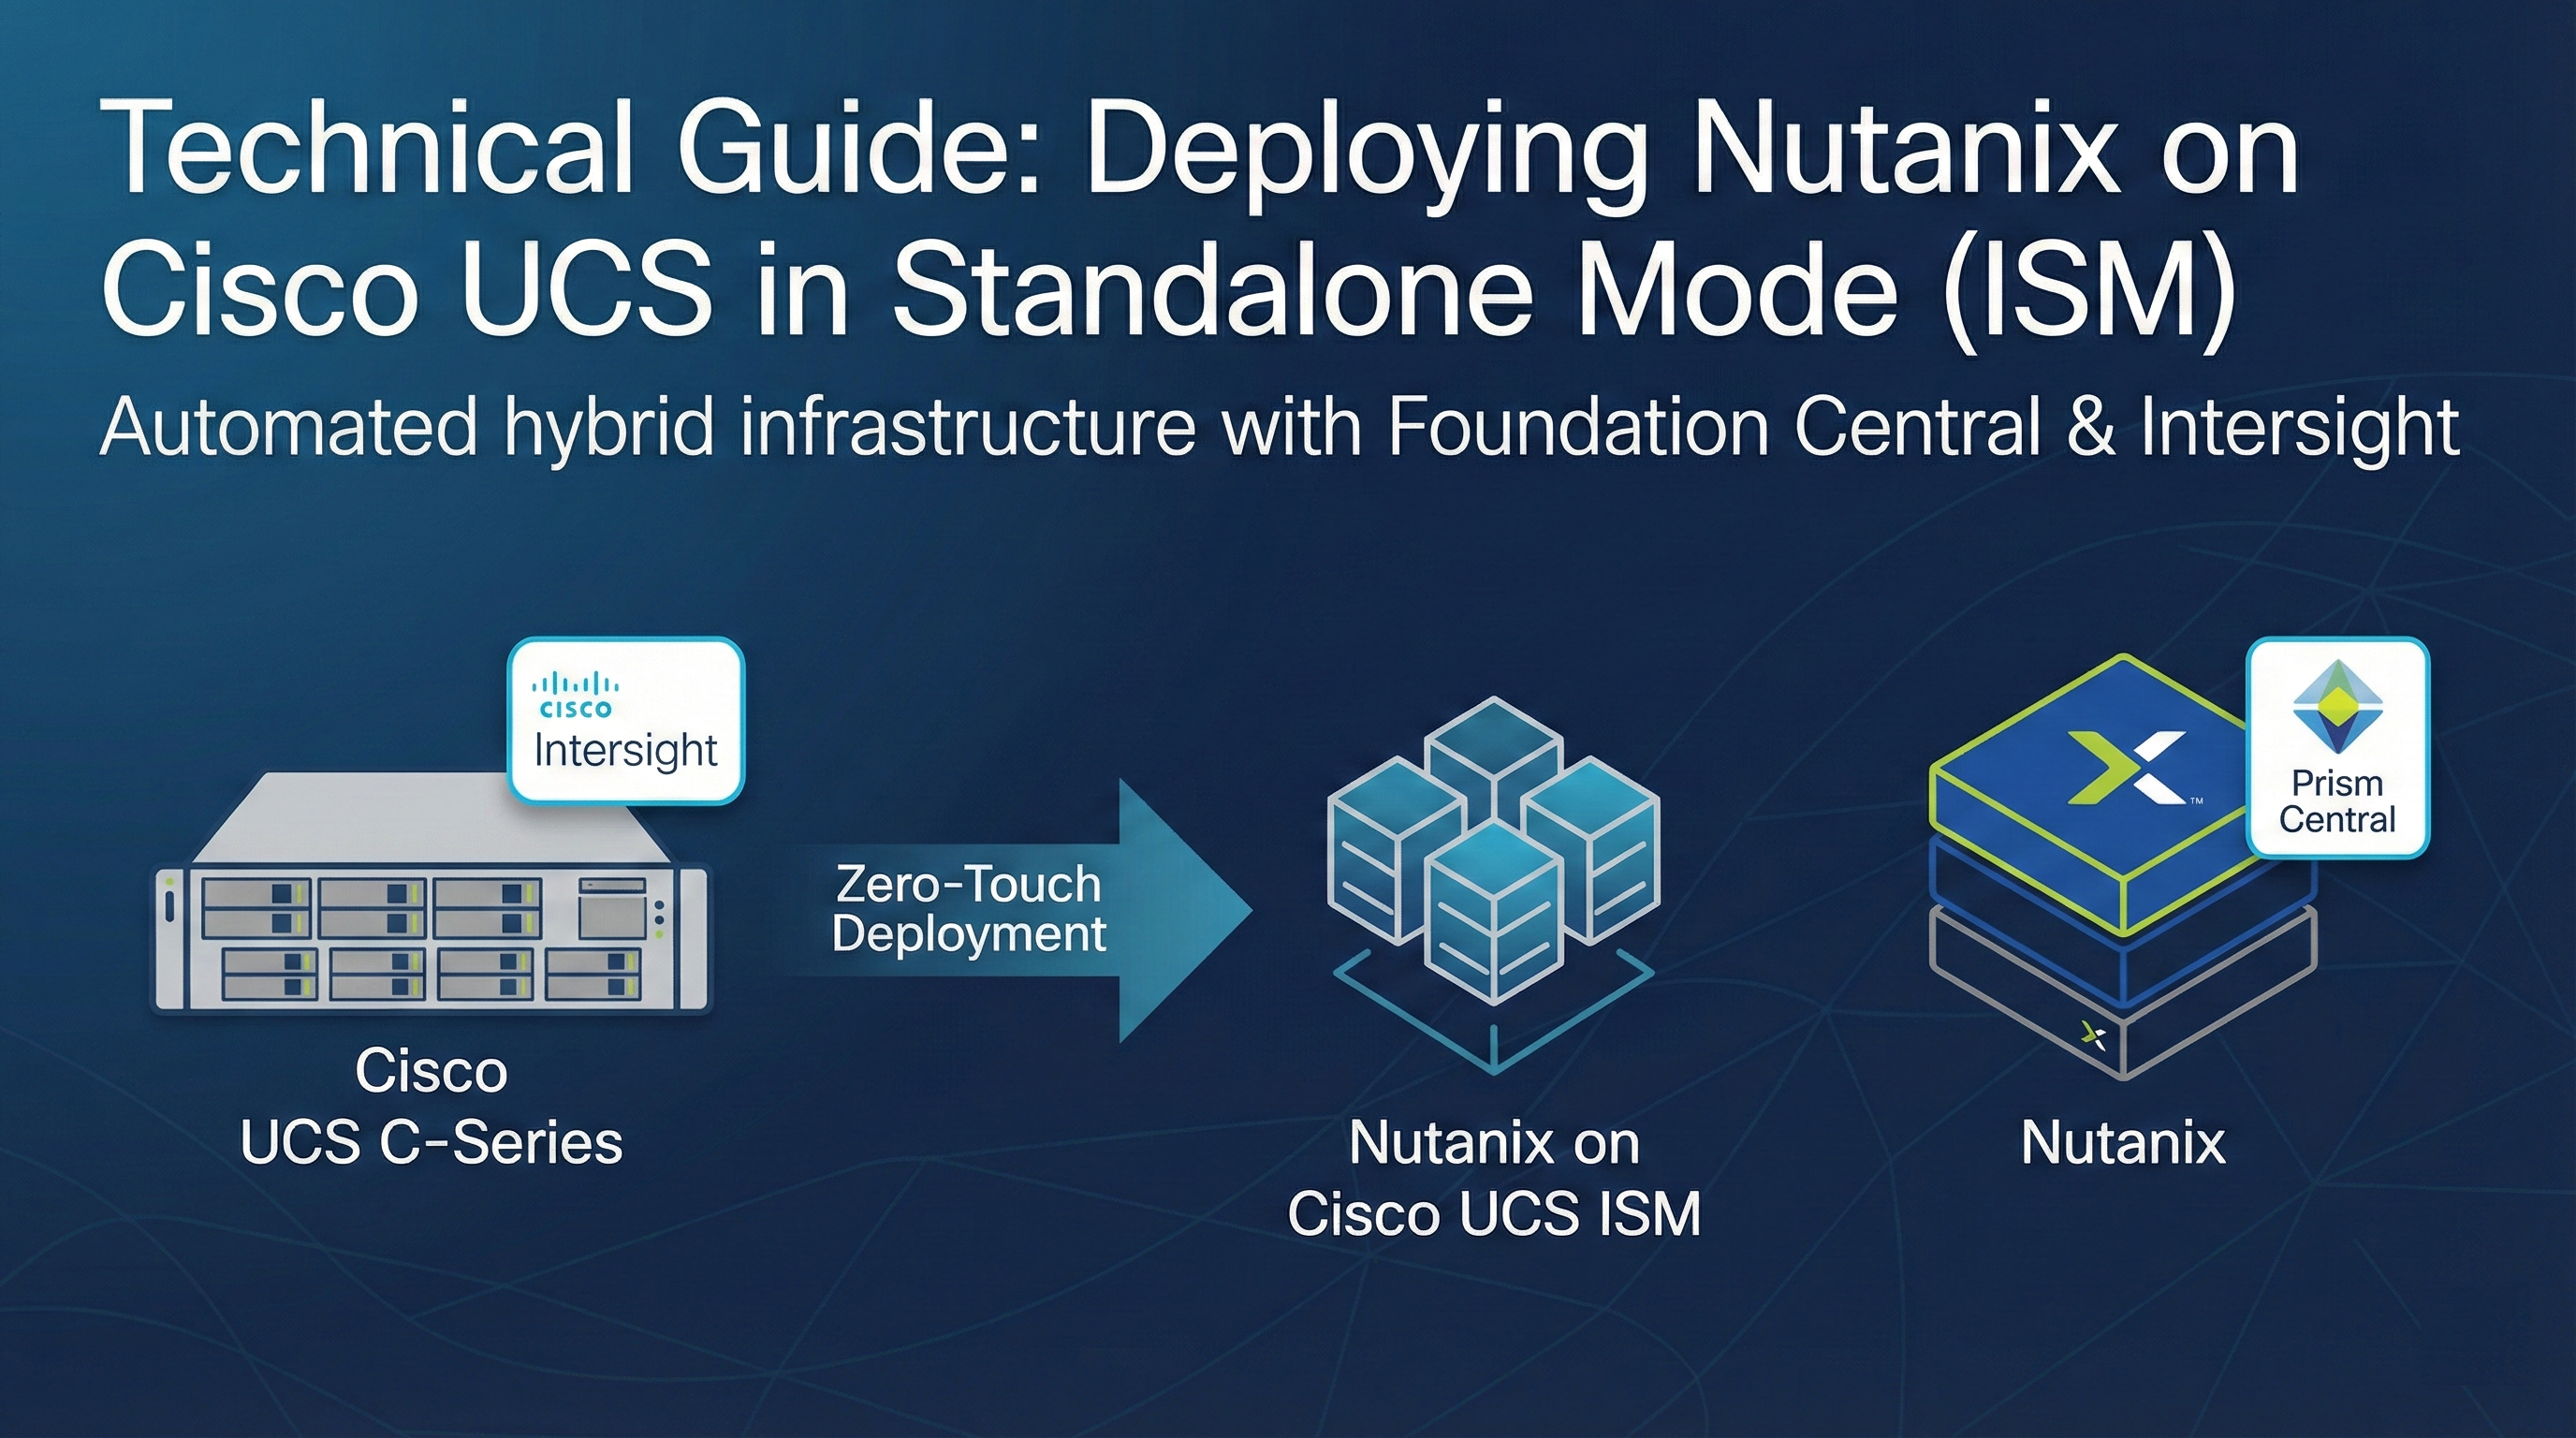
In modern data center architectures, the ability to deploy high-performance infrastructure without the complexity of Fabric Interconnects is a significant advantage. Running <strong>Nutanix Cloud Infrastructure (NCI)</strong> on <strong>Cisco UCS C-Series</strong> servers in <strong>Intersight Standalone Mode (ISM)</strong> provides a streamlined, cloud-managed footprint ideal for edge sites and enterprise data centers alike.</p>

<p>By leveraging the native integration between <strong>Nutanix Foundation Central</strong> and <strong>Cisco Intersight</strong>, the deployment process is highly automated, transforming manual hardware provisioning into a zero-touch software-defined workflow.</p>

<hr />

<h2 id="infrastructure-strategy--prerequisites">Infrastructure Strategy &amp; Prerequisites</h2>
<p>Before starting the deployment, it is critical to ensure all components are prepared for communication.</p>

<h3 id="architecture-overview">Architecture Overview</h3>
<p>In <strong>ISM</strong>, Cisco UCS servers connect directly to standard Ethernet switches. This mode removes the requirement for Cisco Fabric Interconnects, while still providing full management through the Cisco Intersight cloud.</p>

<h3 id="software-requirements">Software Requirements</h3>
<ul>
  <li><strong>Prism Central (PC):</strong> An existing PC instance must be deployed with <strong>Foundation Central</strong> enabled from the marketplace.</li>
  <li><strong>Cisco Intersight:</strong> A valid SaaS, Connected, or Private Virtual Appliance account is required.</li>
  <li><strong>Network Services:</strong> Reliable NTP and DNS must be configured for all endpoints.</li>
  <li><strong>Future Roadmap:</strong> Nutanix is developing <strong>Foundation Central as a standalone appliance</strong>. Once released, this will eliminate the current requirement for a pre-existing Prism Central during initial “greenfield” deployments.</li>
</ul>

<p><img src="/assets/images/nutanix_with_cisco_workflow.jpg" alt="Nutanix and Cisco ISM Deployment Workflow" />
<em>
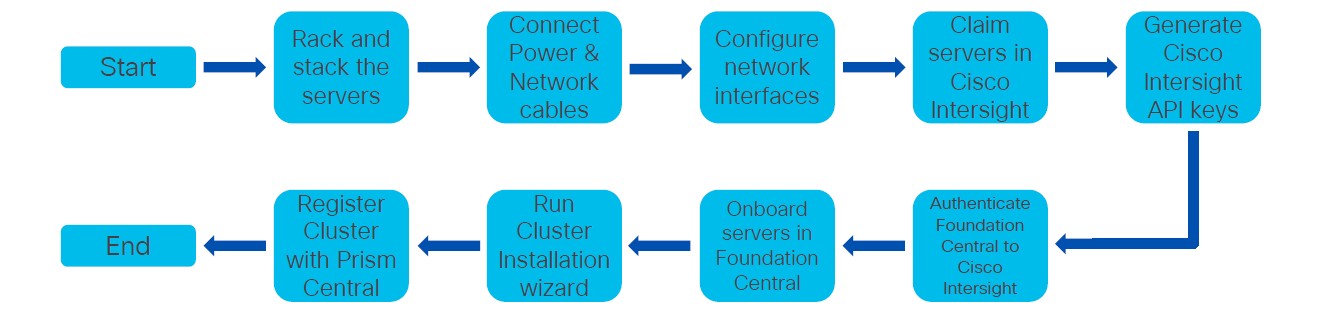
Figure 1: High-level deployment workflow for Nutanix on Cisco UCS ISM.</em></p>

<hr />

<h2 id="detailed-deployment-workflow">Detailed Deployment Workflow</h2>

<h3 id="phase-1-claim-nodes-into-cisco-intersight">Phase 1: Claim Nodes into Cisco Intersight</h3>
<p>The physical servers must be added to your Intersight account to enable remote orchestration.</p>

<ol>
  <li><strong>CIMC Setup:</strong> Configure the <strong>Cisco Integrated Management Controller (CIMC)</strong> on each server with a static IP and DNS.</li>
  <li><strong>Retrieve Codes:</strong> Access the CIMC web interface, navigate to <strong>Admin &gt; Device Connector</strong>, and copy the <strong>Device ID</strong> and <strong>Claim Code</strong>.</li>
  <li><strong>Target Claim:</strong> In Cisco Intersight, go to <strong>System &gt; Targets &gt; Claim a New Target</strong>. Select <strong>Cisco UCS Server (Standalone)</strong> and enter the codes to finish the claim.</li>
</ol>

<h3 id="phase-2-establish-the-management-plane">Phase 2: Establish the Management Plane</h3>
<p>Configure the Nutanix orchestration layer to manage the deployment.</p>

<ol>
  <li><strong>Deploy Prism Central:</strong> If not already present, deploy a PC instance in your environment.</li>
  <li><strong>Enable Foundation Central:</strong> Within Prism Central, navigate to the <strong>Marketplace</strong> and enable the <strong>Foundation Central</strong> service.</li>
</ol>

<h3 id="phase-3-secure-api-integration">Phase 3: Secure API Integration</h3>
<p>Create a secure bridge between Nutanix and Cisco using API keys.</p>

<ol>
  <li><strong>Generate Intersight Key:</strong> In Intersight, go to <strong>Settings &gt; Keys &gt; Generate API Key</strong>.</li>
  <li><strong>Configuration:</strong> Select <strong>API key for OpenAPI schema version 3</strong>.</li>
  <li><strong>Authentication:</strong> Save the <strong>API Key ID</strong> and download the <strong>Secret Key</strong> file.</li>
  <li><strong>Connect Hardware Provider:</strong> In Foundation Central, go to <strong>Settings &gt; Connect Hardware Provider</strong>. Select <strong>Cisco Intersight</strong>, enter your API Key ID, and upload the Secret Key.</li>
</ol>

<h3 id="phase-4-initiate-automated-deployment">Phase 4: Initiate Automated Deployment</h3>
<p>Launch the final orchestration process to form your cluster.</p>

<ol>
  <li><strong>Node Discovery:</strong> In Foundation Central, navigate to <strong>Nodes &gt; Onboard Nodes &gt; Intersight Standalone Mode (ISM)</strong>. Select the discovered nodes and click <strong>Onboard</strong>.</li>
  <li><strong>Cluster Configuration:</strong> Select your onboarded nodes and click <strong>Create Cluster</strong>. Enter the following:
    <ul>
      <li><strong>Cluster Identity:</strong> Name, RF (Replication Factor), and Intersight Organization.</li>
      <li><strong>Software Images:</strong> URLs for the <strong>AOS</strong> and <strong>Hypervisor</strong> (AHV or ESXi) installers.</li>
      <li><strong>Networking:</strong> IP addresses for the CVMs, Hypervisors, Gateway, and Netmask.</li>
    </ul>
  </li>
  <li><strong>Finalize:</strong> Submit the configuration. Foundation Central will automatically create the Intersight policies, assign server profiles, reimage the nodes, and form the cluster.</li>
</ol>

<hr />

<h2 id="conclusion">Conclusion</h2>
<p>The combination of <strong>Nutanix Foundation Central</strong> and <strong>Cisco Intersight ISM</strong> provides a highly scalable and consistent deployment model. By removing manual hardware configuration steps, teams can focus on delivering application services with greater agility.</p>

<hr />
<p><em>This guide is part of our internal technical knowledge base for hybrid infrastructure. If you are a technical lead managing a team in the field, ensure all ToR switch ports are set to trunk mode before starting Phase 4.</em></p>]]></content><author><name></name></author><category term="hybrid-infrastructure" /><category term="nutanix" /><category term="cisco-ucs" /><summary type="html"><![CDATA[]]></summary></entry><entry><title type="html">Deep Dive: Nutanix In-Place Hypervisor Conversion (ESXi to AHV)</title><link href="https://mrefaay89.github.io/nutanix/virtualization/infrastructure/2026/01/26/nutanix-inplace-conversion-esxi-to-ahv.html" rel="alternate" type="text/html" title="Deep Dive: Nutanix In-Place Hypervisor Conversion (ESXi to AHV)" /><published>2026-01-26T00:00:00+00:00</published><updated>2026-01-26T00:00:00+00:00</updated><id>https://mrefaay89.github.io/nutanix/virtualization/infrastructure/2026/01/26/nutanix-inplace-conversion-esxi-to-ahv</id><content type="html" xml:base="https://mrefaay89.github.io/nutanix/virtualization/infrastructure/2026/01/26/nutanix-inplace-conversion-esxi-to-ahv.html"><![CDATA[<p><img src="/assets/images/nutanix-conversion-header.jpg" alt="Nutanix Conversion Header" /></p>

<p>Modernizing your infrastructure doesn’t always require complex migrations. The Nutanix <strong>In-Place Hypervisor Conversion</strong> allows you to transform an entire cluster from VMware ESXi to AHV while keeping your data local and secure. This native “1-click” feature simplifies the transition significantly.</p>

<h2 id="critical-technical-prerequisites">Critical Technical Prerequisites</h2>
<p>Before initiating the conversion, verify these specific cluster and networking requirements:</p>

<ul>
  <li><strong>NGT Tools:</strong> You must install Nutanix Guest Tools (NGT) on all guest VMs, as they include the <strong>virt-io drivers</strong> required for VMs to boot up after the conversion.</li>
  <li><strong>Networking:</strong> Every host must have one external vSwitch configured with a <strong>homogeneous uplink NIC team</strong>.</li>
  <li><strong>NIC Selection:</strong> The NIC team should include all physical NICs of the chosen speed.</li>
  <li><strong>Load Balancing:</strong> Note that <strong>LACP-based load balancing</strong> is not supported on the NIC team during this process.</li>
  <li><strong>Post-Conversion State:</strong> The NIC team will automatically be set to an <strong>active/passive</strong> state once the conversion is complete.</li>
  <li><strong>Disaster Recovery:</strong> All <strong>DR activities</strong> must be paused for the duration of the cluster conversion.</li>
  <li><strong>VMware Features:</strong> Ensure both <strong>HA (High Availability)</strong> and <strong>DRS</strong> are enabled on the source ESXi cluster.</li>
</ul>

<hr />

<h2 id="step-by-step-conversion-procedure">Step-by-Step Conversion Procedure</h2>

<p>Following the official Nutanix workflow, here are the steps to execute the conversion via Prism Element:</p>

<h3 id="1-initial-configuration">1. Initial Configuration</h3>
<ul>
  <li>Log into the <strong>Prism Element</strong> web console.</li>
  <li>Click the <strong>Gear Icon</strong> (Settings) in the top-right menu.</li>
  <li>Select <strong>Convert Cluster</strong> from the Settings page.</li>
</ul>

<h3 id="2-hypervisor-and-boot-selection">2. Hypervisor and Boot Selection</h3>
<ul>
  <li>From the <strong>Available Hypervisor</strong> drop-down menu, select <strong>AHV</strong>.</li>
  <li>Choose your <strong>VM Boot Options</strong>:
    <ul>
      <li><strong>Preserve power state</strong>: Select this to keep the original power state of your VMs (recommended for automated startup).</li>
      <li><strong>Power Off User VMs</strong>: Select this if you prefer to shut down all VMs manually before the process starts.</li>
    </ul>
  </li>
</ul>

<h3 id="3-vcenter-validation">3. vCenter Validation</h3>
<ul>
  <li>Click <strong>Validate</strong>.</li>
  <li>Enter the <strong>vCenter Server IP Address</strong> and the administrator <strong>Username</strong> and <strong>Password</strong>.</li>
  <li>The system will run a validation check to ensure all prerequisites (Networking, NGT, and DR status) are met.</li>
</ul>

<h3 id="4-binary-upload-and-execution">4. Binary Upload and Execution</h3>
<ul>
  <li>In the <strong>Software Upload</strong> dialog, upload the <strong>AHV ISO</strong> binary you downloaded from the Nutanix Support Portal.</li>
  <li>Click <strong>Convert Cluster</strong>.</li>
  <li>A confirmation message will appear. The cluster will transition to <strong>Read-Only mode</strong> for administrative tasks while the rolling conversion takes place.</li>
</ul>

<hr />

<h2 id="post-conversion-expectations">Post-Conversion Expectations</h2>
<ul>
  <li><strong>Duration:</strong> The total process usually takes <strong>3 to 4 hours</strong>, depending on the size of the cluster.</li>
  <li><strong>Availability:</strong> Because the conversion is performed in a rolling manner, individual <strong>VM downtime is typically less than 5 minutes</strong>.</li>
  <li><strong>Tracking:</strong> You can monitor the live progress of the conversion through the Prism Task dashboard.</li>
</ul>

<h2 id="conclusion">Conclusion</h2>
<p>Transitioning to AHV reduces licensing overhead and prepares your environment for native Nutanix automation. By following these steps and prerequisites, you ensure a stable and predictable outcome for your critical workloads.</p>]]></content><author><name></name></author><category term="nutanix" /><category term="virtualization" /><category term="infrastructure" /><summary type="html"><![CDATA[]]></summary></entry></feed>